Orthographic Projection Assignment Help
Orthographic Projection: Projection Of Straight Lines-Traces, True Lengths
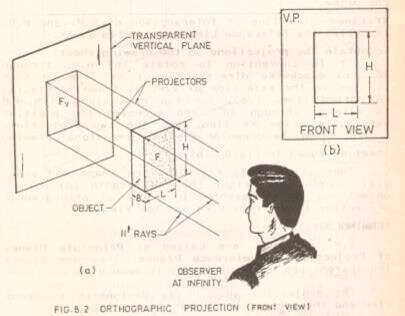
ORTHO means right angle and ORTHOGRAPHIC means right angled drawing. When the projectors are perpendicular to the plane on which the projection is obtained, it is known as orthographic projection.
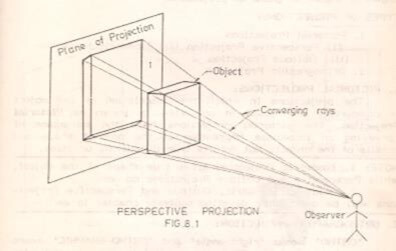
Imagine that the observer looks at the object from an infinite distance. The rays will now be parallel to each other and perpendicular to both the front surface of the object and the plane. When the observer is at a finite distance from the object, the rays converge to the eye as in the case of perspective projection. The observer looks from the front. The front surface F of the block is seen in its true shape and size.

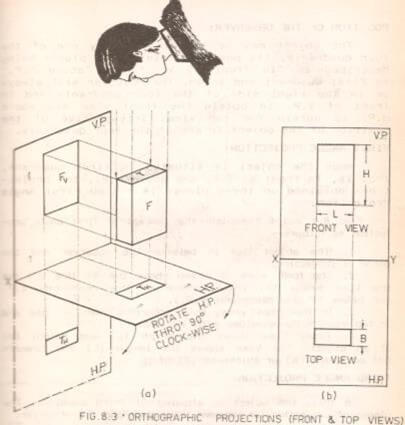
Vertical Plane: Extend the rays or projectors further to meet a vertical plane located behind the object. Join the points at which the projectors meet the plane, in correct sequence. The resulting view Fv is called the front view of the object which is shown in fig b. front view shows only two dimensions, length and breadth of the object. It does not show the breadth. Thus one view is insufficient for the complete description of the object.
Horizontal Plane: As front view alone is insufficient for the complete description of the object, let us assume another plane, called horizontal plane hinged perpendicular to V. P. such that the object is in front of V.P. and above H.P.


Projection Of A Straight Line- The shortest distance between two points is called a straight line. Above, we studied the projections of points. The projections of a straight line are therefore drawn y joining the respective projections to its end points.
Orthographic Projection Assignment Help By Online Tutoring and Guided Sessions from AssignmentHelp.Net
Positions of straight lines with respect to V.P. and H.P.
- Perpendicular to one plane and parallel to the other.
- Parallel to both the planes
- Parallel to one plane and inclined to the other.
- Contained by one plane and inclined to the other.
- Inclined to both the planes.
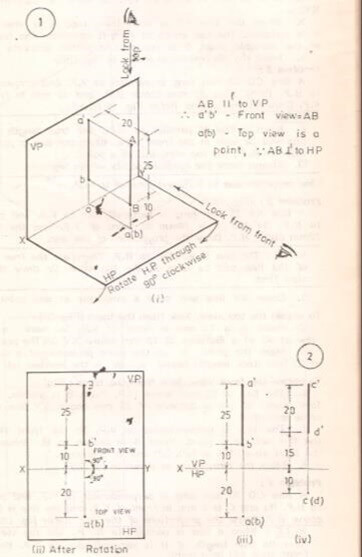
Line perpendicular to H.P. and parallel to V.P. The fig below shows the pictorial view of a straight line AB in the first quadrant.
- Look from the front to get the front view. Since AB is parallel to V.P., ab = true length of AB.
- Look from the top to get the top view. Since AB is perpendicular to H.P., a and b coincide.
- The position of the straight line AB and its projections on H.P. and V.P. are shown in fig (i).
- The H.P. (along with the projection on it) is rotated through 90 degrees in CW direction and is shown in fig (ii).
- The projection of the line on V.P. (front view) and the projection on H.P. (top view) are shown in fig (iii).

Similarly, projections of other lines can be obtained. When a line is inclined at an angle to a plane, it is to be kept in mind that the true length of the line will always be more than the length of projections obtained.


