Impact of E-shopping on consumer buying decisions
Isometric Projection, Isometric Scale
When a solid is resting in its simple position, the front or top view, taken separately, gives an incomplete idea of the form of the object. When the solid id tilted from its simple position such that its axis is inclined to both H.P. and V.P., the front view or the top view or sometimes both, give a fair idea of the pictorial form of the object, i.e., all the surfaces are visualized in a single orthographic view.

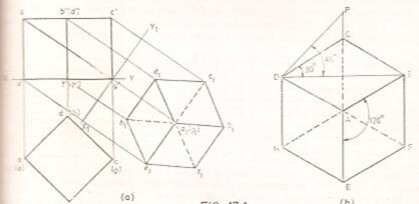
An isometric projection is one type of pictorial projection in which the three dimensions of a solid are not only shown in one view, but also their dimensions can be scaled from this drawing. Iso means equal and metric projection means a projection to a reduced measure. The principle involved in drawing an isometric projection can best be explained by drawing orthographic projection of a cube, resting in H.P. on one of its corners with a solid diagonal perpendicular to H.P. Fig (b) shows the top view so obtained, giving a fair idea of the pictorial form of the cube and is called its isometric projection. It is seen that all the edges and faces of the cube are equally inclined to the plane of projection. Hence the square faces are seen as similar and equal rhombuses.
The three lines AB, AD and AE are meeting at A. these edges are mutually perpendicular to each other in the solid. Since all these edges are equally inclined to H.P., they are making an angle of 1200 degrees with each other in the plane of projection; also they are equally foreshortened. This leads us to the problem of choosing an Isometric scale.
Isometric Axes- The lines AB, AD and AE meeting at a point A and making an angle of 120 degrees with each other are termed Isometric Axes.
Isometric Lines- The lines parallel to the isometric axes are termed isometric lines. The lines CD, CB etc are examples of isometric lines.
Non- Isometric lines- The lines which are not parallel to isometric axes are termed non- isometric lines.
Isometric Planes- The planes representing the faces of the cube as well as other planes parallel to these planes are termed as isometric planes.
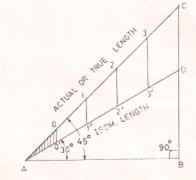
Isometric Scale- Isometric projection is drawn using isometric scale, which converts true lengths into isometric lengths.
Isometric Projection and Scale Assignment Help By Online Tutoring and Guided Sessions from AssignmentHelp.Net
Construction of Isometric Scale:
- Draw a horizontal line AB.
- From A draw a line AC at 45 degrees to represent actual or true length and another line AD at 30 degrees to AB to measure isometric length.
- On AC mark the points 0, 1, 2 etc to represent actual lengths.
- From these points draw verticals to meet AD at 0, 1, 2 etc. The length A1 represents the isometric scale length of A1 and so on.


